
iPhone X has announced the future of smartphones with its stunning features. It always amazed us for its magnificent glass design, wireless charging system, enhanced camera, and a true depth camera for authentication and pay using the Face ID. So, what do you know about Teardown of iPhone X? I will make a big step to satisfy your curiosity, and now we will see how to open and what is hidden within the iPhone X. let’s tear it down completely!

Specification of iPhone X

The iPhone X launched with unique features combined with OLED display excluding home button, Face ID, TrueDepth camera system, wireless charger, and an 11 bionic 64-bit chip. However, here is a brief outline of iPhone X’s technical specifications before striking with the screwdrivers.
Body: stainless steel, both sides of glasses (Gorilla Glass)
Display: 5.8′ inches, 3D Touch, HDR10 with super Retina (OLED technology)
Processor: Apple A11 Bionic 64 bit with the M11 coprocessor
Memory: 64 or 256 GB with 3 GB RAM (no card slot)
Cameras:
Main Camera: 12 MP with F/2.4 aperture
Selfie Camera: 7 MP with F/2.2 aperture
Battery: Fast charging and non-removable (2716 mAh). Up to 21 h talk time durability. Wireless charging system.
Teardown of iPhone X
Step: 1
We started with the bottom stroke with the pentalobe screwdriver. After removing two screws, decently, the bottom screws are more look-alike pins. After heating on the screen’s surface, separating the wires, securing the monitor, and here we go, We exposed iPhone X!
Step: 2
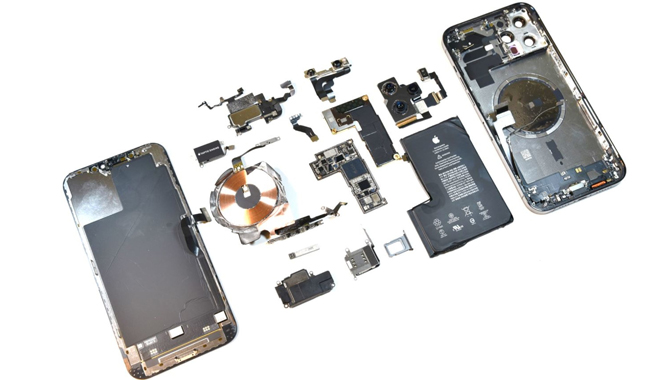
After opening the shell on one side of the iPhone X, we see five attached metal brackets to secure and support the various cables with tri-wing screws in the back. However, after getting rid of the bracket, Many connectors can be seen with a tiny logic board.
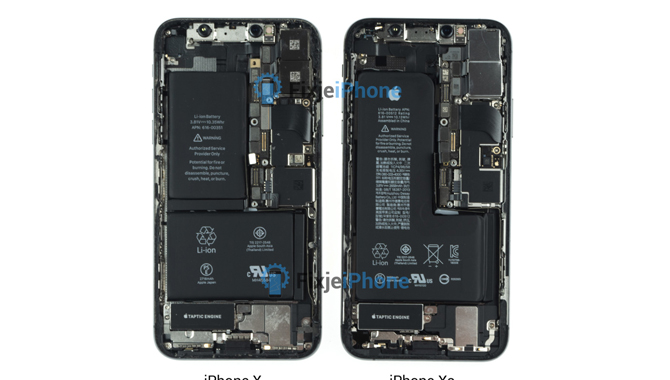
Evidently, by shrinking insides space as much as possible, Apple wanted to acquire a bit more room. Besides, For the first time, we are getting two battery cells in the iPhone with a wireless charging system. Though, here we found a mysterious chip between the lower speaker and the topic engine!
Step: 3
Now the display is removed from the frame, yet very few elements have to separate. After eliminating the display, we have to remove one connector to get rid of the display throughout the alternative. This line contains the light sensor, headset speaker as well as secondary microphone. This time you have to be alert twice times before as the wire is very tiny, delicate, and complicated to remove.
Step: 4
We removed the L-shaped battery by slightly heating the back part and gently pulling out four stickers that secure the battery from inside.
Step: 5
Now, let’s find out where the Face ID recognition system is held! We figured out that the front camera is connected with the infrared projector by the three small cables for the Face ID. Apple wanted to secure the Face ID and front camera in a one-cell block.
Step: 6
We easily removed the dual back camera with telephoto by disconnecting the cables from the logic board in the iPhone. This rear dual camera has 12 Megapixels with wide-angle and aperture capacities.
Step: 7
Now we will remove a tiny logic board from the iPhone X with a cross-headed screwdriver, combined with a few actions of nylon spudger. Voilà! ! Now, we are ready to grip the logic board and take it off the phone. With no fewer than 14 different connectors, this logic board breaks the record for all combined iPhones! The logic card of the iPhone X is doubled: To gain space, Apple stacked two cards on top of each other by welding them together.
Step: 8
Both antenna and the external speaker need dismantling by the removal of the dock connector. These are not delicate to eradicate; you must keep patience to make sure nothing is smashed as their thinner shape makes them more complicated.
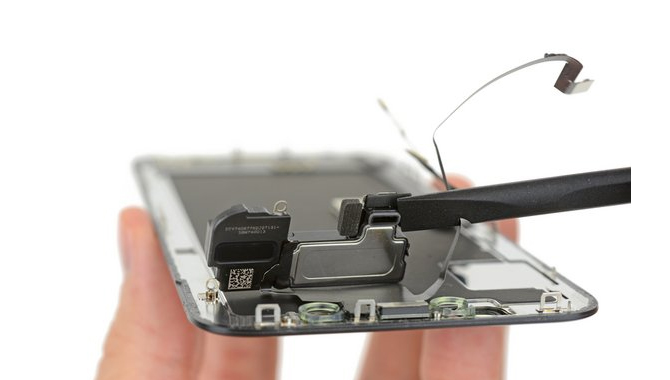
Step: 9
With the help of sensations, a motor named taptic engine is generated vibrations on the iPhone X. This tiny piece of components is located behind the dock connector. However, with the help of tweezers, this component is very easy to remove.
Step: 10
Now, with the help of a nylon spudger, the dock connector’s cable is removed gently by disconnecting it from the frame. The main microphone is embedded with the dock connector.
Step: 11
We found a second antenna under the dock connector that we are still unable to identify. This antenna is glued and is easily separated with a nylon spudger.
Step: 12
Now, let’s talk about the volume and vibrator button. wiThe attachment of this cable barely differs from previous generations of iPhones. However, iPhone X shows us creativity that the cable is soldered to the NFC cable. That means you have to replace the volume button cable to replace the NFC cable.
Step: 13
The power cable, flash, and tertiary microphone used for the video are found as one part. It was quite easy to remove for its placement and being thinner than the others.
Step: 14
Just on the top left of the phone, the Wi-Fi/Bluetooth/GPS transmitter is stuck to the frame. Here we see a few similarities with older iPhone genres.
iPhone Repair: Don’t Try This at Home
People would undoubtedly do it if it was simple to access an iPhone or iPad. They’d go out and buy new screens to replace the ones that had cracked. Or they’d replace the batteries. And 1 out of every 3000 times someone performed this, their iOS device would catch fire.
The danger to an individual is relatively minimal. However, an industry researcher estimated last year that there are around 700 million iPhones in use. Assume that one in every hundred of individuals receives a house repair. Given Cascade’s assessment of the likelihood of a “thermal incident,” that equates to 2,300 fires.
Almost every day, there would be news headlines of someone setting fire to their house while using an iPhone or iPad. There would be images of burn victims. Images of homeless children wailing in the cold. And people would point the finger at Apple. As a result, Apple will do everything in its power to force you to take your damaged iPhone or iPad to a specialist. That is by far the finest solution. So don’t whine.
The Pros
- It is still, as always, flexible, meaning there are still many expendable parts! Now we can believe it on iPhone.
- The display is easier to remove than the other’s series of iPhone, thanks to the small number of parts attached to it.
- The Face ID sensor and the front camera appear to be replaceable.
The Cons
- The logic board is very tiny in size and but consists of two cards fused. So, you have to replace both components if you want to replace one of them.
- The back rear panel is again extremely difficult or almost impossible to remove from the frame of the iPhone X.
- Getting into this phone is pretty similar to iPhone 7 and 8, but it gets a bit easier once you are inside. Here, we reveal all the steps to disassemble your iPhone X. From its border-free edges to the back camera and logic board. So, now we can say that The iPhone X is no longer hold any secrets for you.
Conclusion
I hope now you know about the Teardown of iPhone X.
Leave a Reply