
As the usage of computer has been vastly spread across different criteria over the past few decades, the need to fully utilize the most out of a system has radically increased too.
Nowadays, people usually look to invest less in a system but demands much efficiency out of their money. So the computer technology has evolved in an alarming rate compared to more than any other technologies. And it’s evolving every now and then. So, how to remove thermal paste?
The technology that has been widely used few days back which all thought was the ultimatum of this evolution, is easily out performed and out classed by a technology of today.
It is quite certain, that this technology of today will be much back dated in the coming days and this cycle will continue in the future.
Computer technology has embraced so many changes and adaptations, that this is really a moving thing, all components of a computer needs upgrading from time to time, regularly.
You can’t just depend on a system that is 2 years old to deliver as smooth performance as that of an updated one. You have to change different parts of your computer to keep it up and running. You need also to use latest iteration of technology to bring fluency and dynamism to your so used system.
 Necessities of Heat Maintenance Inside Your System
Heat maintenance is an important thing to keep looking out when using a computer on a regular basis. And sadly though it is the least cared of part of our computer. We really don’t put much thought on the matter of heat regulation.
Computers have become an integral part of our day to day life as if we can’t think of a regular day passing by without the application of computer. Computers have made everything easier for our life.
Now it is our turn to give something back. And what a system mostly demands from the user? The answer is simple, proper maintenance and care. If not, your beloved computer can fall victim to the these adverse reactions of overheating, internally and externally.
To prevent the overheating of computer internally, technologist have invented many creative techniques over the past few years, one of the most efficient and latest version of these kinds of technology is liquid cooling technology which uses thermal paste as its main cooling component.
Thermal paste is the latest iteration of internal heat management technology for computer devices. It is widely used as a result of more and more computer gaming that’s increasing in an significant rate. Playing video games on computer demands much workload from the processor and graphics card.
To pull out such a huge workload, internal components of computer devices look for more electrical power which generates huge amount of energy as residue. This by products over-heats the processor, graphics card and other devices when working under extra amount of pressure.
Thermal Paste : Latest Iteration In Heat Maintenance Mechanism
Overheating can cause all sorts of problems for computer, your expensive processor might not able to deliver as expected, internal chips of the motherboard might burnt up, in general; your computer starts misbehaving, but modern day problems require modern day solutions.
Today’s gaming PCs demand more horsepower, which air coolers can’t match, that’s where the use of thermal paste kicks in. It’s so efficient in cancelling out the over heat and maintain a balanced atmosphere for flexing those gaming muscles.
Even though new cutting-edge technology like thermal paste can make the internal heat management quite so simple, it needs to be changed frequently so that the paste might not dry out.
When exposed to high temperatures for a long period of time, pastes run the risk of drying out causing more problems internally which might sum up to permanent malfunctioning of your computer system. So changing the thermal paste on a frequent routine has huge gravity more so than we think.
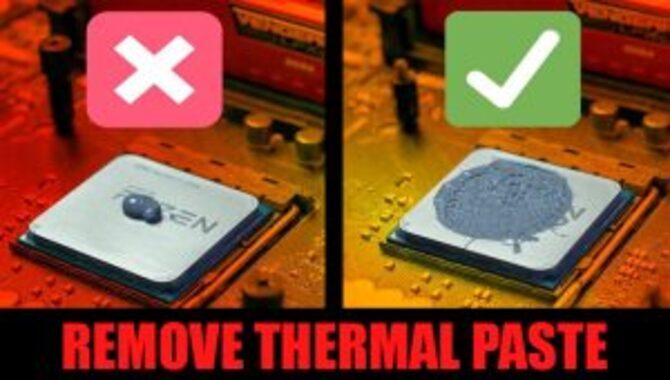
The Problems With The Old Thermal Paste and Why It’s Necessary To Replace With A New One
Thermal pastes are top notch technology that is widely used for the necessities of gaming, well passively. As thermal pastes are the raw material of Liquid Cooling.
Gaming was one of the many ways of passing our boring time but now in this modern days, gaming has become a professional job for many, Gaming industry has grown so large, that to cope up with the modern day consumer’s demand, Gaming computer has come into reality, same goes for other components that has come into play to give proper support to the system.
Cooling is a very important factor because at the end of the long late night sessions, it gives thought system the chance to relax and recover for the upcoming intense sessions.
There was fan generated air cooling, which is still in fashion, but more and more people seek out latest and greatest technologies to upgrade their gaming PC, the more and more it becomes hard for a fan based air cooler to cool the counter parts, so nowadays the practice of using liquid cooler has grown quite popular specially among the gaming crowds.
People who used to love gaming and gaming alone or eSports professionals are opting for liquid based technology to cool their system efficiently and in a short amount of time. Thermal pastes play a huge part in this newest liquid cooling technology.
But everything comes with it’s own side effects. The biggest set back of this thermal paste is that it can dry out pretty shortly which, when happens, can cause a devastating result, not to say that it can ruin your expensive powerhouse.
The Step by Step Demonstration of How To Safely Remove Thermal Paste
There can be sometimes in the coming days, (or it has happened by now and you are looking forward to fixing it), That your gaming power house, which have served you so well and efficiently, can start to act, bit strange,
The normal signs that computer shows when it needed a change in its cooling factor is that it over-heats pretty quickly or it can shut down or cut off its power while you’re in a intense gaming sequence without any short notice.
If your system shows these kinds problems frequently, you have to understand that, your PC’s cooling department need some change, to remove the thermal paste and replace it with a new one to be precise.
Removing the thermal paste can be pretty tough if you don’t know the process it can be felt heavy on your budget of you are to take it to customer care. But fear not anymore, We got you covered. Follow the steps thoroughly and cautiously, this is very easy indeed.
Turn Off Your System
The first thing you have to do, is cut off all the power, you can’t help risking your health by working with a electronic system which is juiced up. But you have to use the shutdown key to turn off your system properly,
Don’t use the power of sleep button because more often than not, this only turns off your operating system just, that is the software. To turn off your computer fully, you have to power it off by using the shutdown button from the Windows bar.
Unplug All Connected Devices and Cords
The next thing you need to do is to detach your system from any power sources, we all know electricity still flies through any electronics, though it is turned off for a while. It can be really dangerous and risky if your computer is plugged in and you still working on it.
Save yourself from the risk by yourself unplugging it from any electrical power source, then you are ready to tinker with your system.
Dislocate The Battery In Case of Laptop
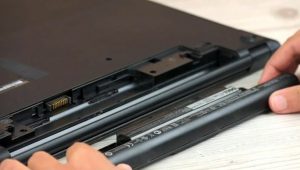
In case you are using a laptop, you have to take the battery out as they battery can still store electricity and it’s generally not ideal to work on the internal of a laptop while the battery is still attached.
Take your laptop’s back part and take out the lid, then cautiously remove the battery and keep it in dry place. It’s safer that way.
Take A Check Again To Make Sure All The Power Sources Are Disconnected
Some amount of electricity can still be present on your system. You can’t take risk while working with an electronic device. Check it twice to make sure that no electricity is bouncing within your system.
To do so, you need to give at least a minute or two to your system so that it can cool down and totally electrically impotent. Then you can work with it and do whatever you need to do.
Take Precautionary Measures Right From The Get Go
Before entering a chemical laboratory, you need to take precautionary measures, right? Computer is an electronic and it’s supporting parts are also used to rely on a huge number of chemical reactions to get their usual job done.
And combine this with the risk of working with a electronic device, you are in a pretty mess.
So it’s always safe to take adequate amount of precautionary measure cause the things you are going to deal with can be radioactive, can be corroding, so if these types of chemicals fell onto your skin, it can do very noticeable damage on your health.
So try to at least put on a pair of gloves, if those gloves are electrically impotent too, Well that is cherry on the top. Also try to cover your eyes with a goggles. It’s not necessary, but let’s not risk our health, shall we?
Go Through Your User Manuals For Getting A Better Bird’s Eye View Of The Process You Are Getting Into
It is always better to be briefed about and have the minimum knowledge of what we are going to do. If you plan wisely and with full concentration of what you’re going to do, that makes the work whole lot easier.
Have a clear idea about your systems cooling mechanics, you don’t wanna end up being stupid while you are trying to upgrade your system, aren’t you?
Read whatever your manual has to say and go over it again and again. Iron out the special cautions that has been mentioned in your manual, Every system is unique and has its own problems, so you need to learn first what type of care your system demands.
Remove Leftovers First, If There Is Any
Though taking much more preparation and cautions, there is always the chance of remaining some unwanted parts which is really annoying.
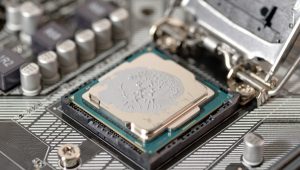
When you need to work with your heat sink, it’s better to check around that area for unwanted residue materials, these materials remain there as by products of the previous thermals.
These residues can be sticky and they must go away. Clean it up properly but not with your hands. Use a soft piece of clothes and use non reactant chemical to remove the residues completely.
Don’t use those type of chemicals in the process that corrodes your whole internal system. Some mild alcohols would be perfect fit for the job.
Clean The Heatsink’s Vents
After you have taken out the heat sink, it’s time to clear its vents as these collect more dusts than any other part of your heat sink, use a soft haired brush to clean it off with gentle strokes. It’s better if you apply a air spray to the dusty area,
But be vigilant as that can also gather another whole lot of unwanted parts from the air and make your heat internals more dusty than it was before. Dusts in the ventricles can give pretty bad impression on the of new thermal pastes that you are trying to put on, so be aware.
Clean Off The Upper Area of The Heat Sink Efficiently
First of all, use the soft nice clothe to clear as much as your can, then for the tiny and small residues that are unreachable for the clothes, you have to take help of the cotton bud, wet the cotton buds with recommended chemical to remove even the tiniest bit of by product you can find.
It is so vital that you must clean it off properly nor it can cause great disturbance for the brand new thermal paste that you are replacing your old one with.
Clear Away The Remaining Residues
After you’ve taken out the old paste safely, don’t get so hurried up to sell the thermal paste. There are one last thing left to do, that is one final clean down. While you’re fully concentrated removing the thermal paste, there always remains a chance.
That some part of the thermal paste might be scattered around, around other parts of the CPU, like processor, graphics card or RAM.
If it happens so, it might be very dangerous down the line, so it is a must do before you are finally done and closed the case, that is to clean off the remaining extra parts that have gathered around in the unwanted territory.
Use the carbon fiber cloth again to give the final touch before your PC is up and set for the application of new thermal paste.
How Can You Get Rid Of Sticky Thermal Paste?
Get the biggest proportion of isopropyl you can find, not the typical 70% (it’s in the pharmaceutical department). Scrape the old trash off using an old gift card, then wipe it with alcohol before applying new paste.
Frequently Asked Questions
1.Is It Possible To Just Wash Away Thermal Paste?
Ans: Swab the thermal paste from the surface carefully using an isopropyl alcohol wipe. Make a straight line with your wipes. Repeat until the thermal paste is gone, using a new wipe each time. Allow it to dry for about an hour.
2.Is It Possible To Remove Thermal Paste Without Using Alcohol?
Ans: If you don’t have any alcohol on hand, use a tiny cloth and wipe hard but gently. And it will take a long time. Neither toilet paper nor paper towels should be used. They leave behind paper lint, which is undesirable.
3.Is It Necessary To Remove The Old Thermal Paste From The CPU?
Ans: Yes, while changing the heatsink, you should always remove/clean the old thermal material and apply fresh thermal compound.
4.How Can You Get Rid Of Stubborn Thermal Paste?
Ans: Get the biggest proportion of isopropyl you can find, not the typical 70% (it’s in the pharmaceutical department). Scrape the old trash off using an old gift card, then wipe it with alcohol before applying new paste.
5.Is It Safe To Use 70% Isopropyl Alcohol On A CPU?
Ans: Those who work with CPUs frequently utilize solutions such as 70 isopropyl alcohol, which is completely safe. Alcohol-based cleaning solutions are quite good for cleaning CPUs, which is why they are frequently utilized in this way. As long as the solution is applied cautiously, it will not harm CPUs.
Conclusion
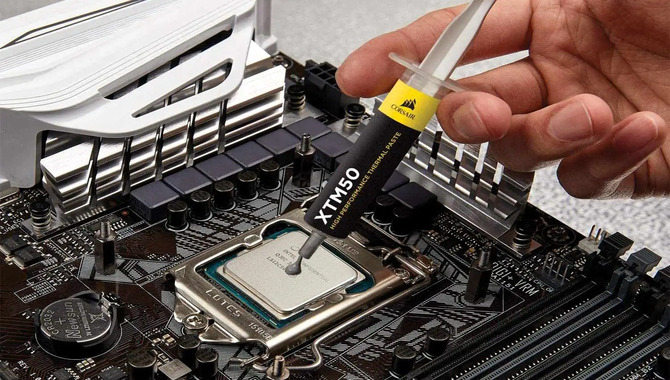
And that’s it, old paste is removed and ready for an upgrade. Once you’ve gotten a day one-like finish, it’s time to reapply your new smooth and moisturizing thermal paste and give your computer the much needed boost that it’s craving for. I hope now you know how to remove thermal paste.
Leave a Reply