
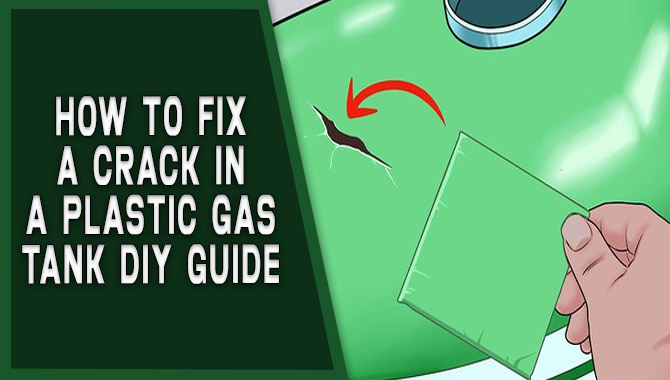
Like most people, you probably don’t overthink cracks in plastic gas tanks. After all, they’re hardly noticeable. But if a plastic gas tank crack is large enough, it can lead to a dangerous explosion. Here, we’ll show you how to fix a crack in a plastic gas tank without any harmful chemicals.
You’ll be surprised how easy it is and how much safer it is than using harmful chemicals. So if you’ve got a crack in a plastic gas tank, this DIY guide is for you. Plastic welders are a very handy tool. When the crack in your gas tank is too wide, it isn’t easy to repair.
A plastic welding gun can easily fix the crack and ensure fuel safety. If you see cracks in your plastic gas tank, it is time to take action. You can do various things to fix the crack and prevent it from getting worse. Follow these simple steps, and you’ll be on your way to a tank that is safe to use.
Plastic Gas Tank Repair
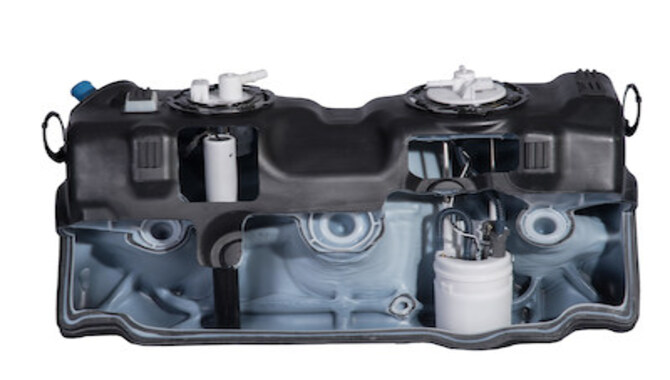
Plastic gas tank repair is one of the most common repairs that mechanics and car owners need to make. A gas tank is a large, often heavy container that stores fuel for your car. The location of the plastic gas tank is usually on the front or rear of your vehicle. When it starts to show signs of wear, your gas tank may start to leak.
This can cause various problems, from minor engine damage to catastrophic fuel fires. If you notice any of these symptoms, getting your plastic gas tank repaired as soon as possible is important. There are a few different ways to do this:
- Replacing the entire plastic gas tank is the most common and cost-effective way to repair a leaking plastic gas tank. It’s also the quickest and easiest option since you just have to replace the entire unit.
- By repairing the leaking part: If you only have a small leak, you can try fixing it with a sealant or patching kit.
- By replacing the rubber gaskets: If the plastic gas tank is completely ruined, you’ll need to replace both the rubber gaskets and the metal internals.
About Plastic Gas Tank
Cracks in plastic gas tanks can cause leaks, which can be dangerous for your vehicle and the environment. Repairing cracks in plastic gas tanks is a relatively easy task with the right tools and instructions. However, it is important to follow the instructions carefully to avoid any damage or injuries. Before starting the repair, clean up any debris from the crack area.
This will help ensure that there are no areas where water could enter and cause corrosion or adhesion issues. If you have any questions or problems while repairing your plastic gas tank, don’t hesitate to call a professional. They can help you fix the crack as quickly and safely as possible.
Tricks To Fix Cracks In The Plastic Gas Tanks
Cracks in plastic gas tanks are a common problem for fuel users. To fix the cracks, you can use a few simple steps. First, use a heat gun to soften the plastic around the crack. Once it’s soft, use a plunger to push the crack open. Afterward, a vacuum cleaner can suck out any debris inside the crack.
Finally, paint over the area with a sealant or adhesive to seal and protect the crack. This should help prevent water from entering the crack and causing corrosion. Let the sealant or adhesive dry before filling the gas tank with gas again to ensure no trace of the crack is left on the plastic surface.
Method 01- Using A Soldering Gun
If your gas tank crack is larger than a quarter inch, you need to get a professional to repair it. You can fix a small crack with a soldering gun, but anything bigger will require a professional. To fix the crack, you’ll need to heat up the solder until it’s soft enough to push into the crack. You’ll then need to apply pressure while the solder cools and hardens, creating a strong bond between the plastic and metal.
Make sure you hold on to the tank while it is happening because it may become unstable if moved too much. Soldering is a common repair technique that uses heat and metal to connect two pieces of metal. We use it to fix circuit boards, wires, and plastic gas tanks. To do this repair, you will need the following materials:
- Soldering gun
- Heat-resistant gloves
- Wire brush or sandpaper (optional)
- JB Weld (or another similar adhesive)
1,Preparing The Plastic Tank

If you have a crack in your plastic gas tank, the first step is to determine the size of the crack. Once you know the size, you can start preparing the plastic tank for repairs. One way to do this is by using a soldering gun to seal the crack and prevent further damage.
You can also use Epoxy or glue to strengthen the plastic tank. When repairing a plastic gas tank, it’s important to wear safety goggles and gloves to protect your hands from chemicals and sharp edges. Additionally, clean the area thoroughly before proceeding with the repair work.
Fixing The Crack With Solder
If the crack is small, you can repair it using a soldering gun. This tool has a small tip that you can use to conduct heat and melt the solder. You can use it to fix small cracks in plastic gas tanks or fuel pipes. However, you need to call a professional if the crack is larger. Solder can be toxic if not handled properly, so you must follow the instructions carefully while using the gun.
Additionally, if the gas tank is still under warranty, the manufacturer may be able to fix it for you. In some cases, they may even cover the tank replacement cost. But regardless of who fixes it, always seal the crack completely before filling up your vehicle’s tank again.
Cleanup And Maintenance
Cleaning up any debris you may have spilled during the repair process is crucial before you start. Use a soldering gun to join the two pieces of plastic together. This will help ensure a good seal and prevent water from entering the gas tank. Once the repair is complete, use a heat gun or a hairdryer to seal the crack and prevent water from entering the tank.
These steps will help ensure that your plastic gas tank lasts for years. It’s important to clean it regularly and ensure there is no debris or particles inside to ensure that your plastic gas tank remains in good condition. You can do this by taking it outside and cleaning it with soap and water or using a vacuum cleaner. Also, ensure not to overfill the tank, as this can lead to leaks and other damage.
Applying Heat
If the crack in your plastic gas tank is small, you can fix it using a soldering gun. This device has a tip that you can use to apply heat to a specific area. If the crack is bigger and requires more heat to heal, you can use a torch or a hair dryer to heat the crack until it becomes pliable, and then use a metal object to press the two pieces of plastic together. Sometimes, you may need to replace the gas tank if the crack is too big to fix with heating. However, try to repair the tank first and see if you can patch it up.
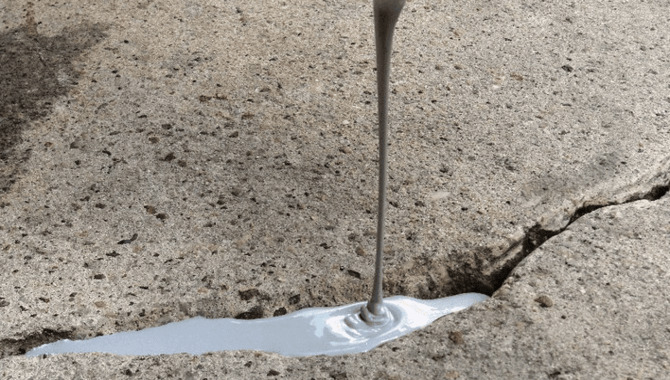
Use Epoxy
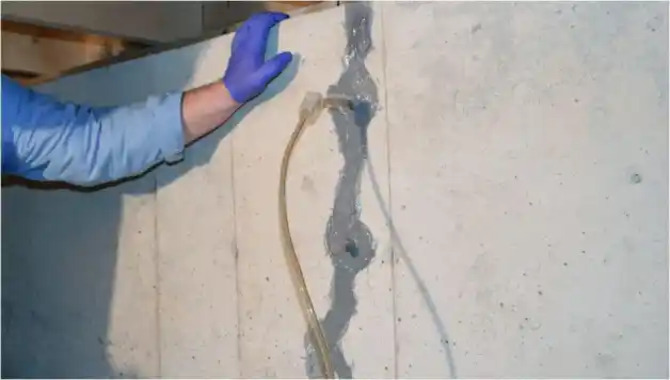
If you’re repairing a crack in a plastic gas tank, Epoxy is the best glue to use. It’s easy to apply and hardens quickly, making it ideal for repairing cracks. First, use a putty knife or a chisel to remove the cracked area of the plastic gas tank. Then, apply Epoxy to the crack and seal the seam with your fingers. Cure the Epoxy for 24 hours before using it, and apply a light coating of Epoxy to the outside of the gas tank.
Hold the gas tank while applying pressure with a plunger to push the Epoxy into the crack. Remove any excess epoxy with a putty knife or a chisel, and cut off any excess epoxy with a utility knife. Once you dried the repair, clean and dry the area before painting or sealing it.
Prepping The Plastic
If you have a small crack in a plastic gas tank, Epoxy may be the best solution. Epoxy is a two-part adhesive that can fill cracks and seal the surface. You will need to clean the crack and surrounding area with acetone before applying the Epoxy. Once the Epoxy is applied, it will form a strong seal that will prevent water from entering the crack.
It is important to note that Epoxy must be used carefully and safely and requires some prep work before application. First, you must clean the crack and surrounding area with acetone to remove any debris that could interfere with the adhesive. Then, use sandpaper or another abrasive tool to roughen up the surface of the plastic tank. This will allow the Epoxy to adhere better to the surface and create a strong seal.
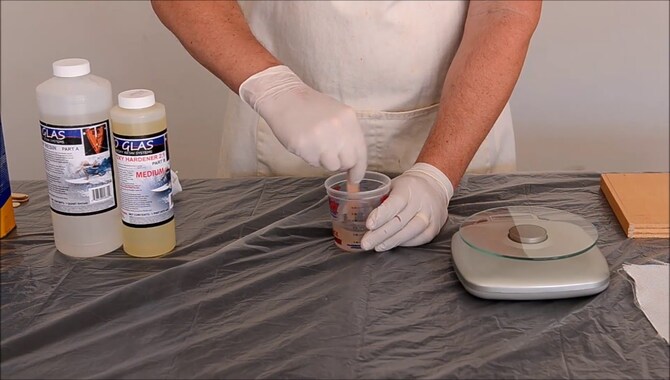
Mixing Epoxy

If the crack in the plastic gas tank is small, try using a hair dryer to heat the Epoxy and fill the crack. This will work best if the crack is shallow or narrow. If the crack is wider or deeper, you need to use Epoxy and a putty knife to fix it. You can mix Epoxy according to the instructions on the package before applying it to the crack.
After fixing the crack, make sure to seal it with a coat of epoxy sealant. This will help ensure that the repair stays strong and lasts for years. Finally, keep your plastic fuel tank properly maintained and avoid overfilling it. This will help prevent cracks from forming in the first place.
Applying Epoxy To The Crack
To fix a crack in your plastic gas tank, you can use Epoxy to seal the leak. This will help prevent water from entering the tank and damaging your vehicle’s fuel system. Epoxy is available in various colors, so you can choose one that best matches the surrounding plastic.
Typically we can apply it with a brush or a sprayer, and you must mix it thoroughly before application. Once you apply the Epoxy, it is important to wait for it to dry before filling the tank with gas. If you have difficulties applying or using Epoxy, consult a professional for help.
Letting Epoxy Dry

If you have a crack in your plastic gas tank, Epoxy is the best solution. It is a two-part adhesive that is activated by heat. You mix the Epoxy and the filler material before applying them to the crack. After applying the Epoxy, allow it to dry completely before using the gas tank.
When using Epoxy for a crack in a plastic gas tank, it is important to let it dry properly and ensure that all excesses are removed from the surface. This will help to ensure that the epoxy bonds properly and stays strong over time. Additionally, it is important not to use too much glue or filler material when patching a plastic gas tank crack; this can lead to poor adhesion and later leak.
Clean The Crack With A Degreaser
If the crack in your plastic gas tank is small, you can use a hair dryer to heat the Epoxy and fill the crack. This will work for smaller cracks. However, you’ll need to use Epoxy designed for plastic gas tanks for larger cracks. Apply the Epoxy carefully to avoid getting it into the lines or holes of the tank.
To finish, clean the area where you applied the Epoxy with a degreaser to remove any residual adhesive. This will ensure that the Epoxy stays in place and doesn’t begin to leak again soon after application.
Apply Epoxy To The Crack
If a plastic gas tank crack is small, you can try fixing it yourself using Epoxy. This type of adhesive is used to combine two pieces of plastic, so it is likely to be effective at repairing a crack. Before applying the Epoxy, clean the area thoroughly so that any residual chemicals from the gas tank don’t cause additional damage.
Then apply a thin layer of Epoxy to the crack and allow it to dry. When the Epoxy is fully cured, replace the cracked gas tank with a new one. However, clean the area thoroughly before replacing it, so you don’t accidentally create another problem.
Cure The Epoxy

If you have a crack in a plastic gas tank, Epoxy is the best solution. This type of glue is strong and can help repair the crack in the plastic tank. It’s important to ensure that the crack is clean and free of debris to use Epoxy effectively. After cleaning the crack, apply a small amount of Epoxy to the area and press it against it for several minutes.
Allow the Epoxy to set before using it to repair the plastic tank. Once cured, you can remove any excess with a wire brush. It may take several hours or days for the Epoxy to cure fully, so be patient and allow enough time to harden. Using Epoxy effectively prevents a hole from spreading and keeps your plastic gas tank in good shape.
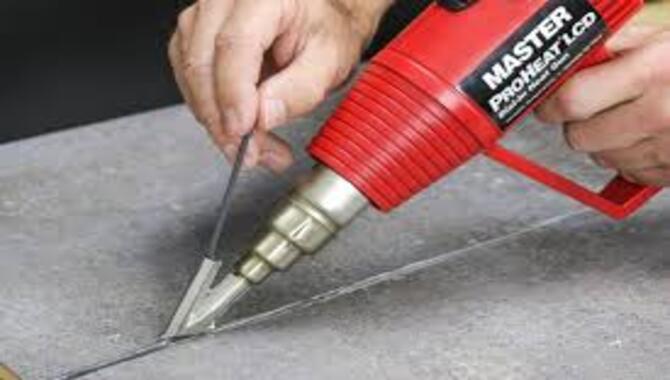
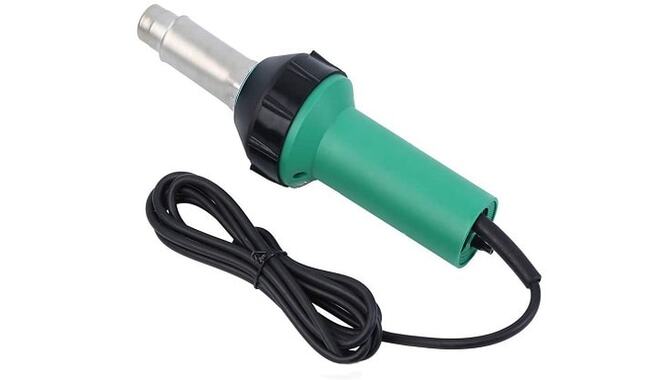
Use A Plastic Welder
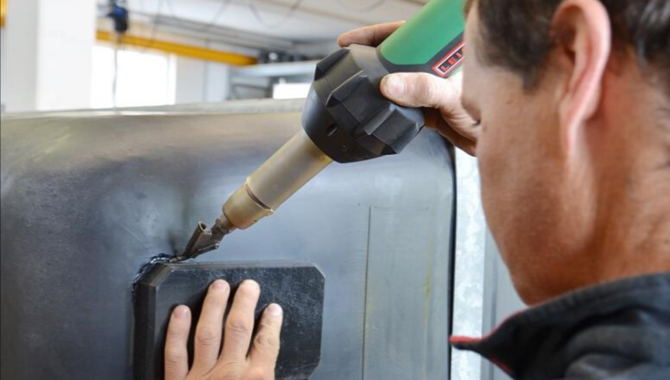
A plastic welder is an invaluable tool for repairing cracks in plastic gas tanks. It’s a simple and effective way to seal cracks, splices, and other defects. You can use a plastic welder to repair plastic toys, household items, and even plastic gas tanks. First, read the instruction manual carefully to learn the basics of using a plastic welder.
When using one, ensure that the fuel tanks are empty and free of debris or impurities. Also, ensure that the welded area is clean and dry. Once you are ready to use a plastic welder, follow these steps to repair the crack with it:
Materials You Will Need
A plastic gas tank can be easily repaired using a plastic wrapper. You will need the following materials: a plastic welder, a gas tank, a welding rod, drill bits, a tape measure, a straight edge, and paint or sealant. First, you must prepare all the necessary materials for the repair job.
You’ll need a welder, a gas tank, a welding rod, drill bits, and other tools. Next, you must carefully prepare the area where you want to weld. This includes cleaning the surface and painting it with primer or paint to avoid damaging it during welding. After that is done, you can start welding the crack in the tank.
Safety Guidelines
If you have a crack in a plastic gas tank, it is important to repair the crack as soon as possible to prevent a rupture in the tank and the potential for an explosion. Safety must be a top priority when repairing the crack with a plastic welder. When welding plastic, always wear protective equipment, including a face shield and eye protection.
Wear gloves and long sleeves to protect your arms and hands from heat and sparks. Additionally, ensure the area you are working in is well-ventilated, clean, and free of debris or flammable materials. Finally, follow safety guidelines when using any welding equipment, including safety regulations and training requirements.
How To Use The Plastic Welder
There are a few different ways to fix a crack in a plastic gas tank. The first option is to use a plastic welder. This tool can be used to fix the crack by melting the plastic and then reinforcing it with metal. This is the most permanent solution and will require extra work after the repair is complete. Another option is to use a filler material, a temporary solution that can fix small cracks or holes in plastic gas tanks.
These materials are easy to use and require no special skills or tools. Consider using a plastic welder or filler material if you’re looking for an effective way to repair a plastic gas tank crack. These solutions are effective, affordable, and easy to implement, making them ideal for any situation. Besides, they’ll save you time and money in the long run.
Conclusion
It is essential to repair plastic gas tank cracks as soon as possible, as the crack could lead to fuel leaks and possibly a fire. There are a number of popular plastic welding methods for tank repairs, and you can find out which one works best for your tank by experimenting on an empty tank first.
The most important thing to remember is that plastic welding requires a high level of skill and experience, so make sure you follow the safety guidelines provided and only attempt plastic welding with training first.As you know, plastic gas tanks are prone to cracking.
In fact, there are times when a small crack can cause the entire tank to leak. However, the good news is that fixing it yourself is very easy with the right knowledge and tools. Follow our steps above and then enjoy your new-and-improved gasoline without fear of leaks.
Frequently Asked Questions
1.Will JB Weld Work On A Plastic Gas Tank?
Ans: If the crack is small, then JB Weld may work as a temporary fix. However, it is not recommended to use JB Weld on a plastic gas tank if the crack is larger or if the tank is already broken. If JB Weld does not fix the crack, you may need to replace the gas tank.
2.How Do You Fix A Crack In A Plastic Tank?
Ans: Option 1: Use a plastic welder. This is the most permanent solution and will require extra work after the repair is complete.
Option 2: Use filler material, a temporary solution that can fix small cracks or holes in a plastic tank. These materials are easy to use and require no special skills or tools.
3.Will JB Weld Fix A Cracked Gas Tank?
Ans: JB Weld will not fix a cracked gas tank. The best way to fix a crack in a plastic gas tank is to replace it. If you do not have the money or resources to replace the gas tank, you can try using JB Weld to seal the crack. Use caution when using JB Weld, as it may be harmful if it comes into contact with water.
4.Can You Plastic Weld A Plastic Gas Tank?
Ans: Sorry to hear that you can’t use plastic weld in a plastic gas tank. Several methods can be used to fix a crack in a plastic gas tank, but the most common is using a sealant. Sealants are available in two types: Epoxy and latex. Epoxy sealants are the most durable, but latex sealants are more user-friendly.
5.Is It Safe To Use A Hot Melt Glue Gun On A Plastic Gas Tank?
Ans: Yes, using a hot melt glue gun on a plastic gas tank is safe as long as the glue is used in a safe manner. Make sure to use a heat gun that is properly calibrated and has safety features such as an extension cord and safety guard. Always wear safety goggles, a dust mask, and gloves when working with hot melt glue guns.
Leave a Reply