
If you’re new to tying knots, or if your skills are a little rusty, it can be helpful to learn the butcher’s knot. The butcher’s knot is a basic knot we use for binding ropes together and is also popular as the circlip Knot.
Having trouble tying a knot? Well, the butcher’s knot is an easy knot to tie. We commonly use it when butchering meat and can also come in handy in other situations.
Here, we’re telling you everything you need to know about tying a butcher’s knot. From how to tie it, what materials suits it best, and how to maintain it. The butcher’s knot is a simple and easy way to ensure that your string stays tight while tying knots. So without further ado, let’s dive into the butcher’s knot.
About Butchers Knot
Butcher’s knot is a common fishing knot that we can use to suspend a line between two points. It is also popular as the square tourniquet, and we often use it to secure lines while hauling fish or other aquatic creatures. The butcher’s knot consists of three parts: an overhand loop, a hanging loop, and an underhanded loop.
The overhand loop should form using half of the total length of the rope (or whatever cord you are using) and the two ends tied together in an overhand knot. It would be best if you then made the hanging loop by taking the end from the overhand loop and making another close-to-the-ground overhanded loop, stretching it out so that both loops are equal in size.
Finally, make an underhanded loop with this stretched-out hanging loop – holding on to both ends of this last underhanded loop as you do so – and tie it off neatly at either end. Anyone who’s ever tied a knot knows the frustration of constantly worrying about it coming undone. The butcher’s knot is one such knot that is easy to tie and ensures a secure hold. In the following steps, we’ll show you how to tie a butcher’s knot.
Easy Steps To Tie A Butchers Knot
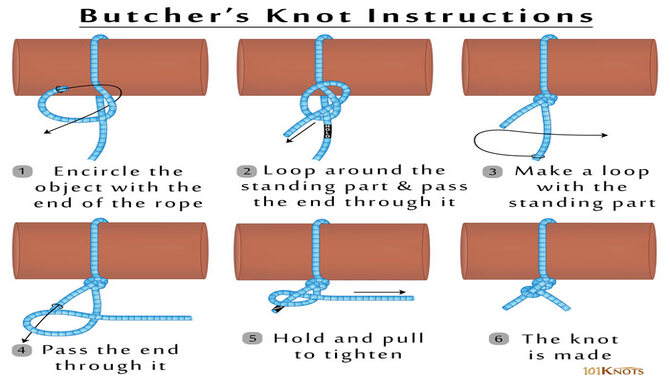
A butcher’s knot is easy to tie a secure knot in cords or string. The butcher’s knot is also popular as the slipknot. To tie a butcher’s knot, you need to form a loop first. Next, make a second loop the same size as the first one. Then, put the larger loop over the smaller one and tuck it underneath. This creates the knot. To tighten it up, pull on the loops until they become tight and the knot is secure.
The butcher’s knot is useful for various applications, including securing rope for climbing or hanging from trees and buildings and making quick traps out of wire for hunting small animals. It’s easy to learn and you can apply it to various strings, such as fishing lines and wire cables. The butcher’s knot is easy to learn and use, and it’s suitable for many different purposes.
You can use it to tie a rope around something, as part of a fishing knot, or even as a simple foldable slip knot. Plus, it’s easy to untie without undoing all the steps. So if you’re looking for a simple yet effective knot to use in any situation, try out the butcher’s knot. Butcher’s knot is a knot we use in butchering to hold the carcass together while cutting it. We can also use it for tying various pieces of meat together, such as hams or shoulders.
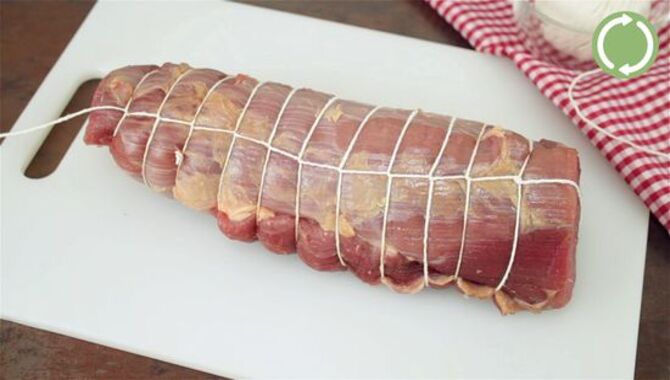
1. Slide Twine Underneath The Roast
The Butcher’s Knot is a knot that we can use to secure food while cooking. It is a simple knot that beginners can easily tie. To tie the butcher’s knot, start by threading the end of the string through the loop on the opposite side of the roast. Next, pull the string tight and make a small loop with your hand.
Finally, slide the loop underneath the roast and tie it in a knot. We can use this simple knot to safely secure food while cooking in various types of cooktops and ovens. It is useful for all cooks who want to ensure their food stays safe while working with it.
2. Bring The Far End Of Twine Toward You
The butcher’s knot is easy to tie and we can use it for various purposes, from securing the rope to hanging paintings or displaying ornamental pieces. To tie a butcher’s knot, loop the far end of the twine around the object once, then pull the twine tight until the knot is secure.
The butcher’s knot is versatile and you can use it in various settings and applications. We often use it to hang items such as paintings and decorative pieces in a hallway or entryway. Plus, you can easily undo it when you need the item again.
3. Arrange Cut End On The Left
To tie a butcher’s knot, start by arranging the cut end on the left. Next, loop the leftovers around the object’s right side, ensuring to tuck them underneath. After that, cross the ends over and tie them together in a knot. This knot is useful for tying various ropes, such as rope or twine, or around packages and other objects.
It is easy and quick to tie and you can use it in various situations. We can use it to secure items during transport or while handling and storage. In addition to practical uses, a butcher’s knot is also unique and visually appealing due to its unique shape.
4. Pinch And Lift
A butcher’s knot is a simple knot that we can use to secure ropes, ties, or bags. To tie a butcher’s knot, start by forming a loop with one rope’s end. Pinch the loop between your thumb and first two fingers, then lift on the thumb and first two fingers until the loop is tight. This will create a T shape in the rope. S
tep 2 is to make another loop with the rope’s other end and repeat the pinching and lifting process. Keep alternating between the two loops to create a strong and stable butcher’s knot. This knot is perfect for various applications, from securing straps on backpacks to securing bundles of clothes in closets.
5. Wrap Around Your Thumb
The butcher’s knot is a useful knot that we can use to secure objects together. To tie the butcher’s knot, you first want to wrap one end of the rope around your thumb. This step allows you to form the loop that will become the knot easily. Next, make a loop with the other end of the rope, and pull it tight against the first loop. You have now tied a butcher’s knot.
The next step is to make the same loop with the other end of the rope and pull it tight against the first loop. This completes the butcher’s knot and ensures tying your object securely together. The butcher’s knot is simple and easy to use, making it an ideal choice to fasten two or more objects together. We can use it for many applications, including tying items in storage or hanging pictures in your home.
6. Bring It Under
Butcher’s knot is a simple knot to secure objects together. To tie a butcher’s knot, first tie a basic knot in the rope, then make a loop with the remaining rope. Hold the loop between your thumb and first two fingers, and place the rope’s end into the loop.
Next, pull the loop tight until it’s under the original knot. The butcher’s knot ensures that the object remains secured while remaining easy to release. This knot is useful in many situations, like securing a line to an object or securing cargo on a boat. It’s easy to learn and can be applied to various types of ropes and ropes lengths.
7. Lift And Thread Through The Hole
The butcher’s knot is used to secure a rope around an object. People named it after butchers, who used this knot to secure the end of a piece of meat as they prepared it for consumption. To tie a butcher’s knot, you’ll first need to lift the rope’s end and thread it through the hole. Next, pull the rope’s end tight and ensure it’s centered in the hole.
After forming a small loop or “bunny ear” at the rope’s end, tuck it behind the main loop. Finally, use your fingers to make a small loop at the other side of the knot and pull it tight. This knot is easy to learn and quick to execute; all you need is some patience and practice.
8. Tighten The Knot
To tie a butcher’s knot, make a loop with the rope first. Then put the rope’s end inside the loop and pull it tight. Next, ensure the knot is tight by pulling on both ends of the rope. To release the knot, push on one end of the rope until it pops out of the knot. The butcher’s knot is useful for securing ropes in place, making it ideal for outdoor activities where safety is a top priority. When tied correctly, this knot ensures that ropes stay tied together regardless of their length or how they are configured.
9. Lift The End
The butcher’s knot is a knot that we commonly use for tying various cords. To tie a butcher’s knot, make a loop with the cord first. Then, place the thumb on one end of the loop and the index finger on the other. Next, put the middle finger inside the first two fingers and bring the end around to meet the thumb.
Finally, take the thumb off the top of the loop and put it back on the bottom to complete the knot. The butcher’s knot is a simple knot that you can use to tie various cords. It is easy to learn, and we can use it in many different applications.
10. Pull Down And Tighten
To tie a butcher’s knot, make a loop with the string, then pull it down until it’s tight. Next, cross the string over the top of the loop and pull it tight. The butcher’s knot is a simple and effective knot that can be used for various purposes, from securing bags to hanging pictures to securing cords for hiking or camping. This knot is always a good idea in your survival kit, as we can easily use it for various purposes.
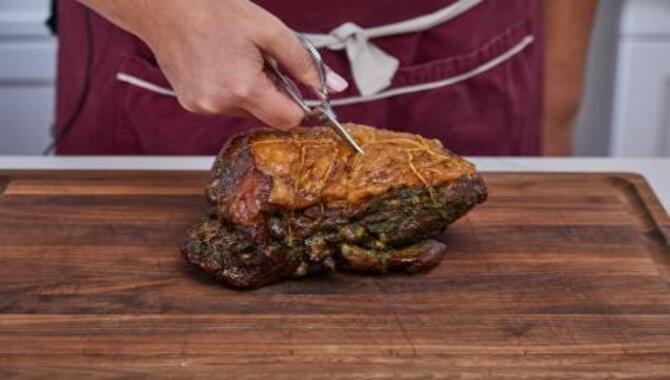
11. Trim Ends
A butcher’s knot is a knot that we can use to fasten string, ties, or other materials together. To tie a butcher’s knot, make a loop in the string first, then reach through the loop and pull tight. The trimmable end should now be at the back of the knot. To trim the end of the knot, pull it through the hole created by the loop. This simple knot is easy to use and makes for a secure and lasting connection between two pieces of material. It can be a helpful tool in any number of applications, from hanging pictures to tying shoes.
The butcher’s knot can be used effectively in various situations, from hanging pictures to tying shoes. When using this knot, keep in mind that the trimmable end must always be at the back of the knot. This ensures that there is no chance of the knot coming undone when working with bulky or irregular-shaped objects. Additionally, it is important to keep the ends of the rope or cord separate when tying this knot so that they do not get caught in each other’s loops during use.
12. Lather, Rinse, Repeat
The butcher’s knot is a simple knot that can be used to tie a variety of knots. It is often used to tie a belt, sash, or scarf. To tie a butcher’s knot, follow these easy steps: lather your hands with soap or dishwashing liquid. Rub the soap onto the knot until it is wet. Wrap the end of the rope around the middle of the loop.
Then tighten the loop by pulling on both ends of the rope. Repeat this process until the knot is tight. The butcher’s knot is easy to learn and can be effective in a variety of settings. It can be used to secure items during outdoor activities, such as hiking or camping, or in jobs that require quick and efficient tying, such as construction work.
Conclusion
Butcher’s knot, a butcher’s knot, or a butcher’s twine knot is an efficient way to tie a loop at the end of a length of cordage. It’s easy to learn and use, and the knot’s simple design makes it perfect for beginners. When tying the knot, slide the end of the cord under the middle part of the cord until it reaches your hand. Then bring the end of the cord over your hand, palm facing down.
Next, bring the opposite end of the cord over your hand, palm facing up, and then pull down on both ends while passing them under your fingers, so they’re looped around your thumb. Secure both ends by passing them through one another a few times. Butcher’s knot can also double as a slip knot if you want to secure something quickly without creating an open loop in the cord.
Frequently Asked Questions:
1.How Do You Tie A Butcher’s String?
Ans: To tie a butcher’s knot, start by tying a basic overhand knot. Next, please make a small loop (about the size of your index finger) in the string and put it over the top of the overhand knot. Take the loop off to one side and put it back on top of the overhand knot. Put your thumb inside the loop and pull tight, creating a knot.
2.How Do You Tie A Butcher’s Jimmy Knot?
Ans: The Butcher Jimmy knot is a versatile knot that can be used for a variety of purposes. To tie it, start by tying a basic knot in the middle of the rope. Make a loop with the remaining portion of the rope and place it over the first loop. All the loops are tight, and then make another loop with the remaining rope. Tuck the end of this new loop under the first loop, and then pull through both loops to create a completed butcher’s Jimmy knot.
3.What Is A Butcher’s Knot?
Ans: A butcher’s knot is a knot used to tie a piece of cloth or rope. To tie it, start by threading one end of the cloth or rope through the loop formed by the other end of the cloth or rope. Make a loop with the remaining end, and stick it through the first loop. Then, pull on both ends of the knot to tighten it.
4.How Do You Tie A Roast Like A Butcher?
Ans: To tie a roast like a butcher, first tie a basic knot. Next, make a “bunny ear” loop with the leftovers of the basic knot. Finally, put the “bunny ear” loop over the “eye” of the basic knot and pull tight to secure it.
5.What Is A Butcher’s Knot, And Why Is It Important?
Ans: The butcher’s knot is a knot used to tie a piece of meat or other food. It is easier to untie than other knots and provides greater stability when tying a rope. The butcher’s knot can be used to tie items such as a bag, belt, or strap.
Leave a Reply