
Single ropes are also incredibly versatile. They can use for climbing, rappelling, backpacking, and sailing. They’re perfect for situations where you need a reliable and efficient means of transportation that won’t disappoint you.
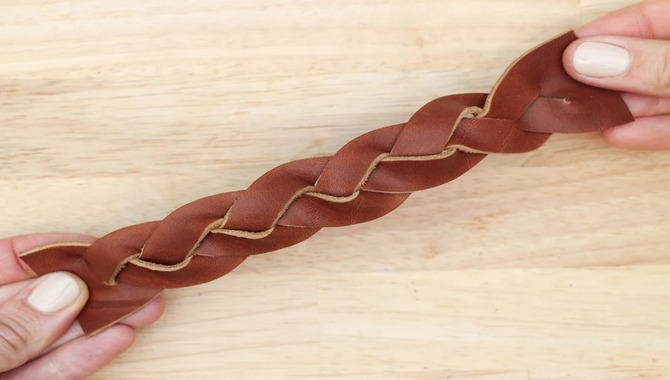
Single rope braid is one of the unique knotting techniques you can try. It involves making a single rope out of a series of rope crossings and twists.
Single rope braid is for you if you want to try something new or improve your knot-tying skills. You can braid a single rope in multiple ways, and we’re here to tell you all about it. Single rope braid features have covered you from the simplest variations to advanced forms. The options are endless, and the possibilities are endless.
Effective Steps To Braid A Single Rope
Choose the correct rope for your intended use. Make sure the rope is of the correct size and weight for your intended use. This ensures that the braid will be sturdy and knot-free. Start by wrapping one end of the rope around a post or tree.
Once the end is secure, take the other end of the rope and cross it over the first loop, making a small knot between the two ends. Continue this process until you have braided a single rope into a tight, sturdy braid. The steps outlined above effectively braid any single rope into a neat strand. You can use them to braid ropes of various sizes and weights with ease.
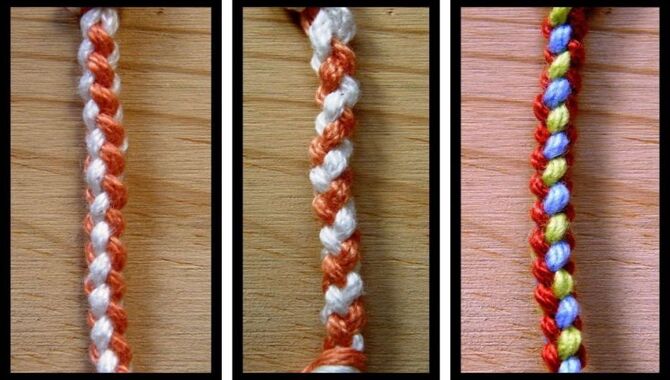
1.Making A Three-Strand Braid
To braid rope into a three-strand braid, start by selecting a rope that is the right size for the job. Use a rope that will be strong enough to hold the braid together without breaking or fraying. Cut the rope into three equal parts, keeping the center of the rope intact.
Thread one end of each piece through a hole on a braid tool, ensuring that the ends of the ropes are facing in the same direction. Pull on each end of the ropes to tighten the braid and create a secure base for your braid. From there, continue alternating between each piece of rope as you work your way up to creating an attractive braid with uniform thickness and appearance.
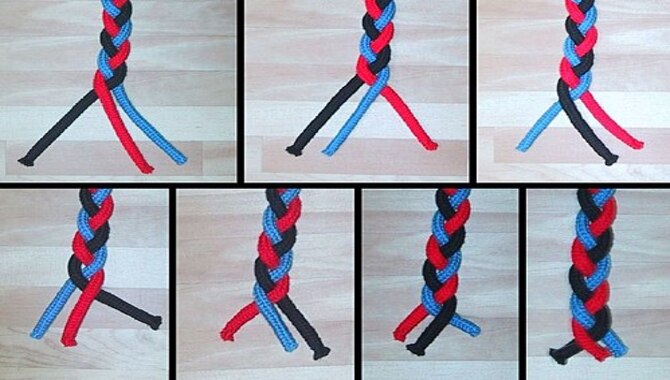
2.Making A Four-Strand Braid
To braid rope into a four-strand braid, start by selecting a rope that is the right size for the job. Use a rope that will be strong enough to hold the braid together without breaking or fraying. Cut the rope into four equal parts, keeping the center of the rope intact. Thread one end of each piece through a hole on a braid tool, ensuring that the ends of the ropes are facing in opposite directions.
Pull on each end of the ropes to tighten and create the base for your braiding operation. From there, continue alternating between each piece as you work your way up to creating an attractive braid with uniform thickness and appearance.
3.Doing A Standard Single Rope Braid
To braid a single rope into a standard braid, start by selecting the right size for the job. Cut the rope into two equal parts and thread one end of each piece through a hole in a braid tool, ensuring that the ends face opposite directions. Pull on each end of each piece to tighten and create an even base for your braiding operation. From there, alternate between each strand as you work your way up to create an attractive braid with uniform thickness and appearance.
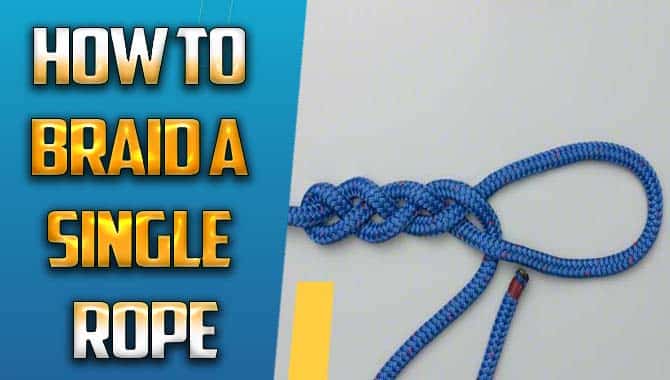
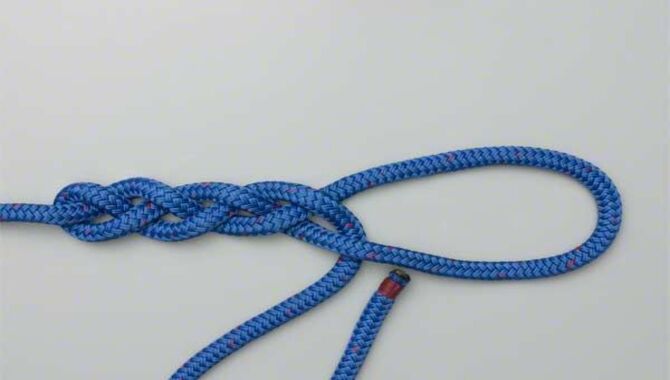
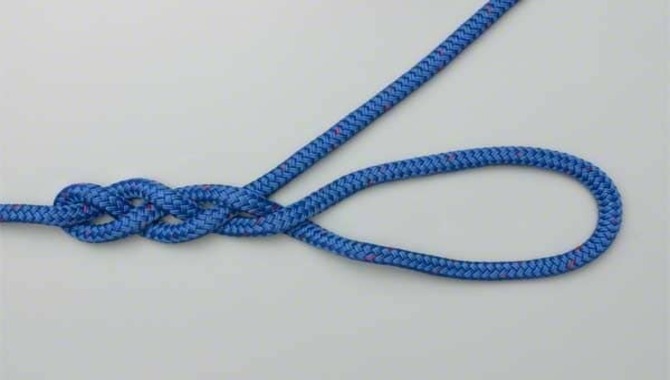
4.Doing A Monkey Braid
Monkey braid is a popular rope braid that can easily do in minutes. It is easy to do and adds beauty and texture to rope projects. The steps involved in monkey braid are as follows: Start by tying a knot at the rope’s end. Next, place a small loop with the rope’s end and place it over the first loop.
Cross the middle of the loops over each other, and pull tight to form a knot. Repeat this step until you have finished braiding the rope into a braid. There are different types of braid that you can use for your project, but the monkey braid is one of the most common and easiest.
5.Features Of Single Rope Braiding
Braid a single rope is an easy and versatile craft you can use for various purposes. Depending on your desired result, there are plenty of ways to braid a single rope. Some examples include simple braids, complex braids, single-twist braids, and knot braids. Each of these styles offers unique benefits and features. Some simple braids provide a low-maintenance way to decorate household items such as ornaments, jewelry, and baskets.
On the other hand, complex braids are great for creating intricate designs with multiple strands. Plus, single-twist braids can use to make sleek shapes, and the knot braid is perfect for creating sturdy structures. It’s easy to create unique household items without spending hours in the kitchen.
Tips For Perfect Braiding
When braiding a single rope, a few tips can make the process go smoothly and produce a braid with consistent shape and size.
– Make sure the rope is of the same diameter and thickness. This will ensure that the braid has the strength to hold its shape. – Hold the two ends of the rope together and start braiding by making a small loop. As you make this first loop, keep it as close to the rope’s end as possible. This will ensure that your braid has a uniform shape.
– As you continue making loops, take your time and ensure that each braid is perfect. Do not rush through any part of the braid, as this could lead to unevenness or gaps in the final product.
– Once you reach the desired length of the braid, tuck in the end and tie it off with a knot to finish off your braid.
Conclusion
A single rope can be used for various purposes, most famously for suspension bridge construction. It’s a simple but effective design that uses tension to hold things up. Though it may not be the most technologically advanced or complex structure, a single rope still has many advantages over other bridges.
For one, it’s much cheaper to build than a bridge with multiple ropes or cables. Second, it’s easier and faster to erect and dismantle – meaning that you can use it in places where other types of bridges wouldn’t be suitable.Braiding a rope is an ancient art passed down through the generations.
It provides a rope of varying strength and flexibility, which we can use for various tasks. There are many variations of single-rope braiding, and you can try them all to see which works best for you. Before braiding, ensure that your rope is tensioned properly and that the strands are parallel. Also, practice on a rope no smaller than six inches in diameter.
Frequently Asked Questions
1.What Is Braiding A Single Rope?
Ans: Braiding a single rope is an easy way to create unique household items without spending hours in the kitchen. It’s an easy way to make a braid with consistent shape and size, and it can use for a variety of purposes, such as decoration, crafting, or structural support.
2.How Do You Braid A Single Rope?
Ans: Here’s how you braid a single rope: 1. Tie a double knot at one end of the rope. 2. Make a small loop with the left half of the rope and insert it into the first loop made. 3. Hold on to the left half of the rope and pull it tight, creating a loop. 4. Repeat the steps until the rope is properly braided.
3.What Are The Benefits Of Braiding A Single Rope?
Ans: There are many benefits to braiding a single rope. This simple process can create a strong and uniform shape. Additionally, braid-style ropes are often easier to handle than traditional rope designs.
4.Can You Braid A Single String?
Ans: Yes, you can braid a single rope. The basic steps for braiding a single rope are as follows: – Choose the right type for the job. For example, if you’re braiding a rope for fishing, you’ll want to use a heavier rope that can take more strain. – Make a loop with one end of the rope. – Take the other end of the rope and make a loop, but do not tighten it yet. – Now, make the loop smaller by pulling one end towards the other. – Repeat this process until the entire length of the rope is braided.
5.How Do You Braid A Single-Strand Paracord?
Ans: To braid a single strand of paracord, start by forming a loop with one end of the cord. Make sure the cord is tight and not flapping around. Take the loop in your hand and make a small “bunny ear” with your thumb and first two fingers. Hold the bunny ear with your other hand and twist the loop to form a “bunny ear” knot. Repeat these steps until you reach the desired length of the cord.
Leave a Reply